This weekend I played around a bit with a relatively new camera. Like many recent digital cameras, it will capture multiple exposures, putting 2 to 10 photos on one image. I did this occasionally in the slide film days, but it is easier and less expensive to experiment with this technique using a digital camera.
The book, “PHOTO IMPRESSIONISM and the Subjective Image“, co-authored by Freeman Patterson and André Gallant has examples of two types of creative multiple exposures made on slide film. Freeman would put 9 to 25 exposures of a single subject on a single transparency moving the camera slightly between exposures. Andre’s favorite technique was to combine a sharp and a very out of focus image of the same subject. He mainly did this by sandwiching two transparencies, but it can also be done in-camera on a single piece of film.
Both of these techniques can be done in-camera with many digital cameras. However, André’s montage approach can also be simulated with a single exposure by blending the original and a blurred layer in Photoshop or just by adding negative Clarity in Adobe Camera Raw. It is also possible to simulate Freeman’s technique in Photoshop from one or more single exposures, but this is a bit more laborious. But wait, while writing this blog I decided to create Action in Photoshop to simulate Freeman’s technique with a single image. You can see the results at the end of the blog.
Below is an in-camera digital version of André’s in/out of focus technique that I made today. If you try this, remember to open your lens wide when you take the out-of-focus shot or it will not be as blurry as you might wish.
My new camera has four multiple exposure overlay modes: Add, Average, Lighten, and Darken. An older camera had just Auto Gain On or Off. Off is identical to Add and On is identical to Average.
Add simply overlays the images without adjusting the exposures (“gain”, although gain really means reduction). If you take a series of photos using Add or Gain Off without adjusting the Exposure Compensation, the result will likely be very overexposed. However, if you use this feature and, say take 9 exposures each at EC = -3, you can get a multiple exposure with a factor of 8 faster shutter speed than you can with Average, all other things being the same.
Average or Auto Gain On is the “normal” mode most would use. It adjusts each exposure so the result will be properly exposed. It is useful, for example, to smooth out moving water if conditions do not allow a slow enough shutter speed.
Lighten chooses only the brightest pixels from the shots to use in the composite. It is a useful mode for overlapping fireworks at night, although this can also be done in Photoshop with multiple images stacked on layers set to the Lighten Blend Mode.
Darken chooses only the darkest pixels from the shots to use in the composite. It is a useful mode for a subject in motion against a light background.
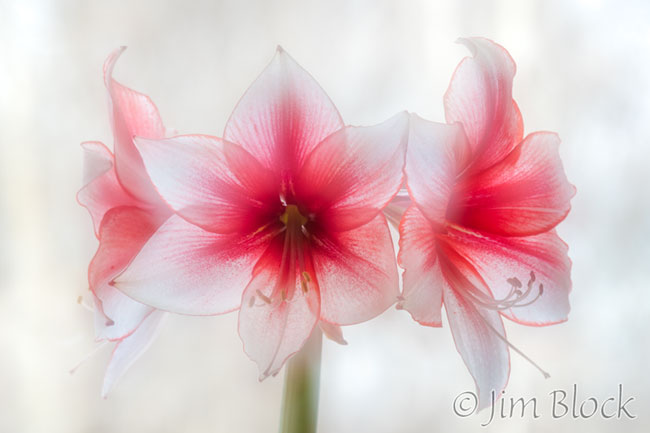
The slide show below has 10-shot multi-exposure images made totally in-camera except for some minor adjustments and the mirroring of one image. For these I used the Darken mode since I basically had a moving subject against a light background. (Actually the amaryllis was stationary near a window and I moved the camera.) These images were made yesterday when the plant only had one blossom fully open.


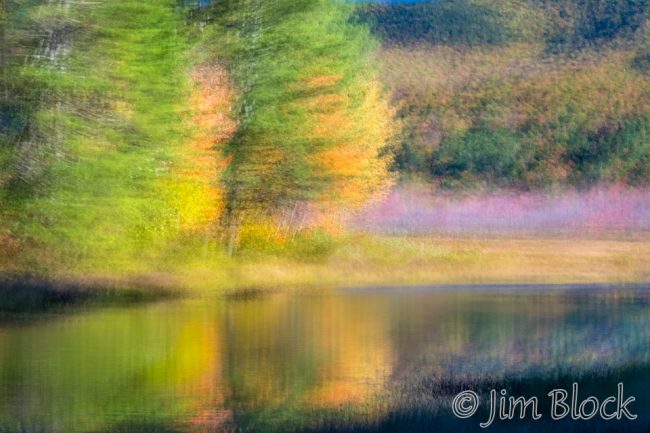
Here is a 10-shot multiple exposure using Average made October 5, 2017 during a great fall foliage season, at least in NH.
If you have a camera with these capabilities you might enjoy experimenting with multiple exposures. And if you want to see some beautiful examples of multi-exposures, get the book mentioned above.
I promised earlier I would show what I did “automatically” with an Action in Photoshop. I created an Action that would duplicate a layer, rotate the copy 5 degrees, and repeat this 9 times. The Action then selected all Copy layers and changed their Blend Mode to Darken. I then selected some images, pretty much at random, from a folder of recent photos in Bridge and used Batch to run this Action on all of them. I sat back and waited and then discarded some of the resultant images. But a few were interesting. Here they are.
The left-side images below are the created one and the right ones in each pair are the original capture.


Perhaps I will create another Action that rotates and/or translates and/or distorts each copy layer by an ever increasing amount. That might be neat. But, as Will Lange says, “I’ve got to get back to work.”