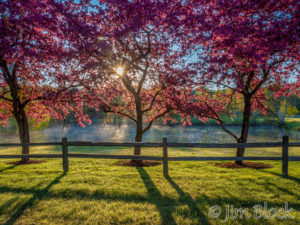
Follow me
Pages
- Home
- Classes
- Portfolio
- New Hampshire
- Vermont
- Maine
- Published Photos
- People
- Birds
- Panoramas
- Annapurna Circuit in Panorama
- Bicknell Brook
- Bicknell Brook January 16, 2011
- Bicknell Brook January 6, 2011
- Flights of Fancy
- Jiri to Everest Base Camp and Kala Patthar 2012
- Moose River in Winter
- Nepal in Panorama
- Nulhegan Basin from Lewis Overlook
- SRK Greenway 10 in Winter
- Star Lake Farm on Snowshoes
- Sunapee in Winter
- Early Snow on Smarts Mountain
- Lake Sunapee
- Lower Cascades
- Dartmouth in Winter
- Hardy Hill Brook
- Grafton Pond
- Mormon Barns
- Moose Mountain on Snow Shoes
- Baker Bush
- Mount Moosilauke
- Baker Bush Wetland
- Henniker Bagel Break
- Millstone
- Mount Kearsarge
- Central NH in Fall
- Willoughby Ski New Years 2010-11
- Mink Brook
- Gillingham Store
- Great North Woods Panoramas
- The Prouty 2011
- View from French’s Ledges
- Cardinal Flowers near Adder Pond
- Mount Cardigan
- Chapel at the Kingdom
- Minister’s Brook
- Skinner Brook
- River Road
- Bob’s Barber Shop
- Glacial Erratics Trail
- Nepal
- Annapurna Circuit Trek
- Arrival in Nepal
- Kathmandu and Patan
- Trip to Besi Shar
- Besi Shar to Bahundanda
- Bahundanda to Jagat
- Jagat to Dharapani
- Dharapani to Chame
- Chame acclimatisation day
- Chame to Pisang
- Pisang to Manang
- Manang acclimatisation day
- Manang to Yak Kharka
- Yak Kharka to Thorung Phedi
- Thorung La
- Muktinath to Jomson via Kagbeni
- Jomson and Marpha
- Fly to Pokhara
- Pokhara & Kathmandu
- Bhaktapur
- Kathmandu
- Faces of Bhaktapur
- Faces of Kathmandu
- Faces of Nepal
- Distributing Jackets
- Annapurna Circuit Trek
- Special Subjects
- Created
- Weddings & Portraits
- Details
- Contact Jim
- Trails
- Blog
Images on this site
Get the Flash Player to see the slideshow.Blog Topics
Archives
- May 2013
- April 2013
- March 2013
- February 2013
- January 2013
- December 2012
- November 2012
- October 2012
- September 2012
- August 2012
- July 2012
- June 2012
- May 2012
- March 2012
- February 2012
- January 2012
- December 2011
- November 2011
- October 2011
- September 2011
- August 2011
- July 2011
- June 2011
- May 2011
- April 2011
- March 2011
- February 2011
- January 2011
- December 2010
- November 2010
- October 2010
- September 2010
- August 2010
- July 2010
- June 2010
- May 2010
- April 2010
- March 2010
- February 2010
- January 2010
Tag Archives: Photo tips
LX7 First Ten Days
Cameras and lenses are just tools. It’s not the equipment, it’s the photographer that makes pictures. I’ve had students with extensive and expensive gear who make very pedestrian photos. And I’ve had students with wonderful eyes for light and composition consistently make marvelous images using entry-level models and kit lens, even before they learned to use something other than AUTO.
However, each time Panasonic has come out with a new model in their compact LX series, I have upgraded. I had to think about it longer this time but when there was a brief Black Friday sale at a great price I couldn’t resist. I’m glad I made the move. In addition to a faster (f/1.4) lens, the LX7 has a number of very nice features. I have always liked the fact that it is very easy to change settings without resorting to menus, and even that characteristic has been improved. The built in 3-stop neutral density filter was a nice surprise, since I very much enjoy photographing moving water like the photo below made two days ago with the LX7.

Most photographers benefit from owning a capable pocket camera in addition to a DSLR. It can be carried many times and places where a DSLR would not. When I’m riding my road or mountain bike my LX is around my neck or in a small pouch on the crossbar. The photo below was taken early in a Northeast Kingdom Lakes Century ride a few years ago.

Although I stopped briefly after a long uphill climb from Crystal Lake to catch my breath and make this photo, I’ve gotten fairly adept at shooting while riding. The photo below was taken while in motion as I completed my first Prouty Century ride. Just ahead of me are two riders from Creare, an outstanding Hanover, NH company. Since they were pulling a child, they only did the 35 mile loop. Both of these biking photos were taken with the LX5 which was around my neck full time for these and other rides.

A small camera or cell phone camera can put subjects at ease compared with pointing a huge lens at them. Sometimes there is a real advantage to not looking too professional.

The LX7 has a number of “professional” features: easily changed Exposure Compensation settings, a focus spot you can move anywhere in the frame and even quickly and easily change its size, 5 frames/second in raw and up to 60 in JPEG. It will auto-bracket three shots up to +/-3 stops (vs Nikon’s one stop), and it does it lightening fast so handheld HDR merges are certainly possible.
What would it cost to outfit your DSLR with a 24mm, f/1.4 lens that focuses to less than a half inch? Panasonic sells a Leica-branded lens with these specs. It comes attached to the LX7 camera. And it is a zoom lens.
When I don’t need or want to carry a macro lens, the LX is my capable substitute. While the excellent camera in my iPhone is “always” with me, so too is the LX7 which shoots raw, has an almost 4X zoom ratio, and allows control of the aperture. The photo above to the left is a “macro” shot with the LX7 of a remaining bittersweet seed.
Below are some of the photos I made with the LX7 during my first 10 day shakedown period. The bird near the middle of the slide show is a common redpoll, part of this year’s huge invasion of “winter finches” that have come down from Canada to find food. To see more photos I took with this camera during the first month, click HERE>
Photographing the Stars
Last week featured cool, clear nights and a fairly new moon. Ideal conditions to see lots of stars. So, prompted by a question I was asked about photographing stars in one of my classes, I went out and experimented with photographing the sky—something I rarely do at night.
The photo below show the view almost directly overhead just after midnight November 16. North is to the top, east to the right. The camera sees far more than the naked eye does. I certainly did not see this many stars or the Milky Way. There is considerable light pollution on both horizons.

This photo was taken at ISO 3200, 17 mm on a full-frame camera, f/4, and 8 seconds. In hindsight I wish I would have given it a stop more exposure, f/2.8, but I was worried about my ability to focus accurately. It is several individual photos merged together.
Pleased with my early attempts, or maybe just having fun and learning things, I decided to try star trails, also from my backyard. But I was not content to leave the photo I captured alone so I combined it with one taken in Nepal at Khari Gompa in Thamo. The mountain in the background in the composite below is Thamserku. The star trails image was shot at ISO 200, 17 mm on a full-frame camera, f/8, and 94 minutes.

Perhaps you would like to try your hand at this. Use wide angle, manual exposure, and manual focus. Use exposure times less than 30 seconds to get reasonable sharp stars and as long as you dare for star streaks. And, of course, a solid tripod.
Posted in Nature, Photography Tips
Also tagged Milky Way, night sky, photography, sky, stars
Comments Off
Photographing the Moon, Part 2
In mid-July I related some thoughts and gave some hints on photographing the moon, given the upcoming blue moon. I commented that I mainly photograph the moon opportunistically. That is, I almost never go out to try to get a photo with the moon in it. If I am photographing something else and the moon cooperates, I’ll take advantage of the opportunity. But last weekend, which I spend on Lake Sunapee, was different. I intentionally shot the moon and tried to put into practice some of the photographic suggestions I made. If you haven’t read the previous post you can find it HERE.
August 31, 2012 featured a blue moon. Specifically this was the second full moon in August, which is one of the two types (definitions) of a blue moon as described in the earlier piece.

In the previous post I suggested that the night of a full moon might not be the best time to photograph it if your intent is to both show detail in the moon and have a foreground that is lighter than a silhouette. I suggested: “To photograph a landscape to the west, it is best to shoot the day after the full moon at sunrise. To photograph a landscape to the east, plan your shot for the day before the full moon at sunset. At these times the moon will rise or set as the sun sets or rises, and you can get an exposure for the landscape that is close to the right exposure for the moon. And there will be some color in the sky which is normally a plus.”
The photo at the left was taken August 28, 2012, around 8 pm, three nights before the full moon. It was quite dark; this was an 8 second exposure at ISO 400 and f/13. So I got an adequate exposure for the lake and cabin, but no detail in the moon.

One day later, still two evenings before the full moon, the situation was much better. The photo at the right was taken around 6:30 pm, August 29. The both the sun and moon are in the sky together and the moon almost looks full. Fifteen minutes later the same evening I made the photo below.

Continuing with the “evenings before a full moon in the east” I took the two photos below the day before the full moon at around 7:30 pm less than 2 minutes apart. The eastern sky has color at sunset, there is sufficient light on the scene, and there is detail in a moon that certainly looks full, though it was not actually full yet.


Finally the full moon. The photo below was taken at 6 am the morning of the full moon. The sun hadn’t yet risen; the foreground is lit only by the early sky. Below this photo is a slide show of some photos shot the mornings of August 31 and September 1, 2012.

Normally the best time to photograph a full moon setting in the west in the early morning is the day after the full moon. The moon will appear full and there will be enough light on the foreground to balance the bright moon so you can see detail in both the moon and the ground. The three photos below were all taken the morning of September 1, 2012, the day after the full blue moon.
The top photo on the left below was taken around shortly before sunrise. The second photo on the left was made about 30 minutes after sunrise. The photo on the right was taken 5 minutes after that. Although the images here are small and it is hard to tell, there is detail in the moon in all three photos.


The following image of the moon was taken August 30, 2012, but that isn’t the key element here. How did I create this image? For those of you who understand Photoshop, a quick summary of the steps involved follows the image.

The above image is a composite of three photos of the moon, each shot with a shutter speed of 2.5 seconds. In each case I moved the camera randomly during the exposure. I combined the three in Photoshop using the Lighten Color Blending Mode. I created a fourth layer of the result (“stamp visible”) and slightly transformed that layer to fill the frame a bit better. Minor adjustment layers followed. Perhaps I could have gotten something similar with a lower ISO and one 10 second exposure and avoided using PS, but this is what I did. I was just playing, I just took 4 photos like this, and after the fact when I saw what resulted I combined three of them.
If you are interested in Photography you might enjoy visiting and “liking” my more-active Facebook photography page Tug Hill Photography.
Posted in Photography Tips
Also tagged blue moon, full moon, Lake Sunapee, moon, photography, Sunapee
Comments Off
Photographing the Moon
Once in a blue moon, or maybe a bit more often, I opportunistically photograph a full moon. I almost never plan to do so; all of my photos here were taken from where I was at the time. I did not travel specifically to get a moon photo. Here are some thoughts and ideas if you wish to plan and photograph a full moon or even a waning or waxing moon. And be prepared, we are in for two blue moons in a row.
By the way, what is a blue moon and what is the correct exposure to show detail in a full moon no matter what color it is? Well, the modern definition is a blue moon is the second full moon in a given month, as we will have next month. So if you photograph the full moon at the end of August you can claim that you photographed a blue moon. However, an older definition holds that a blue moon is the third full moon in a season with four full moons. Since there are 4 seasons and normally 12 lunar cycles each year, there are normally three full moons in each of spring, summer, autumn, and winter. But things are not this in sync so occasionally a thirteenth full moon sneaks in and one season has four full moons. Even though there will be two full moons in August, 2012 (and September, 2012!), there will not be a seasonal full moon until August, 2013.
More importantly for photographers, what is the correct exposure for a full moon if you want detail and not a white blob? Ever hear of the Sunny-16 rule? Before and even after the advent of light meters it was used to estimate the correct exposure for a scene lit by the sun on a sunny day. It states that the correct exposure is an aperture of f/16 and shutter speed of 1/ISO. So just set your camera to manual exposure, the aperture to f/16, and the shutter speed to the reciprocal of the ISO you are using.

But what of the moon? It is simply an object lit by the sun so this rule also gives the correct exposure for the moon, though not necessarily for anything on earth in the same photo. Some people fudge the rule a bit to get a slightly brighter moon and apply the Moony-11 rule, but either works well. Of course if the sky is hazy you might have to increase the exposure, sometimes quite a bit. This is particularly the case just at moon set or rise when it often has a yellow color from all the atmosphere the light must pass through. Fortunately we now have good ways to check the exposure. And if you are shooting raw you have a much better chance of recovering detail in what would be a blown out (overexposed) moon with a JPEG capture.
If you want to photograph a full moon with something on earth that is not a black shilouttte, when is the best time to do so? It turns out the best times to photograph a full moon is NOT when the moon is full.
As with many photographs it is useful to visualize the photo you would like before you even see what you are going to take a photo of! Galen Rowell called it previsualization and wrote it was the most advanced way of making a photo. In any case it is helpful to think about what you are after and what the photo(s) might look like before you set out to take them.
What are you trying to do? Get a close up of only the moon? Incorporate the moon in a scenic? How big in the image? Foreground a silhouette or with detail? How about the sky? Stars too? Most people want the full moon and some nice, decently exposed, landscape elements too. Perhaps a hillside with an old barn in Vermont.
As I said, the best times to photograph a full moon are when the moon is NOT full. If you want more than a silhouette of the foreground in the photo, a day (or maybe two) before or after the full moon is often best depending if you are a morning or evening person and/or which way you plan to aim your camera. You want the sun to be low in the sky at the same time as the moon so the sun will light the landscape. When the moon is fully full, the sun sets before the moon rises, unless you are in a tall building or on a mountain.


To photograph a landscape to the west, it is best to shoot the day after the full moon at sunrise. This is what I did in the photo on the right above taken from my home in Etna looking over the Connecticut River Valley into Vermont. In it you can see the fall foliage illuminated by the rising sun. The foliage is very red because the particles in the Earth’s atmosphere scatter the shorter wavelengths of the light — the blue hues. When the sun is very low this leaves the longer red wavelengths to pass through. When the sun is high in the sky, blue light from the sun is scattered in all directions on its way to the Earth causing the sky to look blue.
The left photo above shows a setting hunter’s moon over the fog in the river valley at dawn the morning of the full moon. A hunter’s moon is the first full moon after the harvest moon, which is the full moon nearest the autumnal equinox. In both cases above the moon has a hue due to the length of the earth’s atmosphere the light must pass through when the moon is low in the sky.
To photograph a landscape to the east, plan your shot for the day before the full moon at sunset. At these times the moon will rise or set as the sun sets or rises, and you can get an exposure for the landscape that is close to the right exposure for the moon. And there will be some color in the sky which is normally a plus.
Below is a photo to illustrate this. The moon looks full but it really isn’t. The photos was taken out my Danfe Lodge window looking east at one of the most beautiful mountains in the world at 5:13 PM from Khumjung, Nepal on November 1, 2009, the day before the full moon. The setting sun is illuminating the top of Ama Dablam and providing nice light on the rest of the scene. There is detail in the moon.


Sometimes when you are working another subject the moon appears at just the right time and location. Of course you need to be awake and prepared. Anne Davey, who has taken a number of courses with me but was a good photographer and an experienced Photoshop user before she started them, is completing a 3 year project to photograph buildings in Boston. Last year she did a show at DHMC with large prints of her Boston photos that she expertly framed herself. Just over a week ago, on July 3 she took the photo on the right at around 5 AM of a moon setting over Boston. Anne wrote to me:
“I believe that I stopped breathing for an instant when I saw the moon peek out from behind the Hancock Tower while I was shooting. Definitely a case of being in the right place at the right time. I took several shots while I waited for the moon to fill the space between the buildings.”
If you overexpose a moon at dawn or sunset it can resemble the sun behind a thin cloud or in fog. That is what happened with the photo below of the setting moon taken in Arizona December 24, 2007 at 7:06 AM, the morning of a full moon. The moon is overexposed because I exposed for the landscape that was not yet lit by the rising sun.

Often when you have a chance to photograph a full moon your timing is wrong or the environment won’t cooperate or one of many things that makes photography so challenging and rewarding happens. Often there are three problems to confront. First you want to get a lot in the foreground but then the moon is too small. Second, since your timing is wrong, the moon is too bright for the foreground. Third, since you are pretty close to the foreground and the moon is pretty far away, you have a depth of field issue. The way to solve these problems is to do what photographers have done for years with the moon—double expose. But now it is easier with Photoshop because you don’t need to get both images on the same piece of film or be a darkroom wizard. You can simply take two photos and combine them.
I’m certainly not condoning “cheating”, especially not in nature photos. But photography as an art is perhaps another matter. Sometimes combining multiple images can better express what you saw or felt. After all no photo ever is a completely accurate depiction of reality. In any case, it is up to the individual photographer to decide how many of the image optimization and enhancement tools he or she wishes to employ.
Earlier this year while in Nepal on a month long trek we were honored by a puja ceremony at Khari Gompa, a Buddhist monastery in Thamo led by Khari Rimpoche. This was especially significant for the nuns since it was the night of the full moon and they were honoring a good friend, one of my travelling companions. But since the ceremony took place around sunset, I was not able to photograph the moon until it was high in the sky. There it was when I looked up at the newly painted entrance of the prayer hall, but all of the challenges mentioned above were also present. So I took two photos and the result is below.

The moon shown here is in the same place it was in the image of the prayer hall doorway, but it was overexposed and too small. It was a simple matter to drop the second exposure of the moon into the sky region of the first.
How might you make a non-full moon look full and also show the stars? Shoot at night and overexpose the moon. You won’t get detail in the moon but you can produce an image where the moon resembles the sun in a dark sky with stars. The photo below was taken from the same window as the 2009 image at the top of this blog but at 4:25 AM on April 17, 2012, looking east at Ama Dablam (which is at the far left) when the moon was only 4 days away from new. The faint glow at the left is the rising sun which will rise to the left of Ama Dablam.


To the right is a piece of the right side of the same scene photographed 3 minutes earlier but exposed and processed to reveal what the moon really looked like. By the way, why can we see the dark side of the moon? What is the light source for it? Stop reading and figure out for yourself. I’ll give you a hint, the phenomena is called “earthshine”. If that isn’t a big enough hint, the answer is at the end of this piece. You can get great photos of earthshine if you photograph the moon a few days before or after a new moon. The four days of this photo were a bit too long before the new moon, but this was just an opportunistic shot.
Photos of earthshine when the moon is just a sliver can be quite dramatic. The first photo below shows the waxing moon near Mount Ascutney in Vermont at sunset. The second photo below shows a conjunction of the moon, Venus, and Jupiter.


You can read Part 2 of this piece by clicking HERE.
If you are interested in Photography you might enjoy visiting and “liking” my more-active Facebook photography page Tug Hill Photography.
Earthshine is when the dark side of the moon is lit by light from the sun that is reflected off the earth. Any questions? Send me an email.
Posted in Nepal, Photography Tips
Also tagged Ama Dablam, blue moon, conjunction, earthshine, full moon, Khari Gompa, moon, photography
Comments Off
