How can you get more sharpness, depth-of-field, resolution, and dynamic range than you’re entitled to get? You simply violate “the rules” and work some Photoshop magic.
This is NOT an article on being sloppy and fixing it in Photoshop. Instead it describes a way to use modern digital tools to quickly and easily produce images you simply can’t get by taking a single shot. I use the term Pseudo-HDR Pans here. However, there are various embodiments of this concept with different names but with a common element of combining two or more images.
When I teach my classes how to shoot and stitch panoramas I give them a set of “rules”: use a tripod, use manual focus, use manual exposure, and lock-in your white balance. However, Photomerge in Photoshop and other stitching software has gotten so good that you can violate most of these rules much of the time. Given this fact, you can use rule violations to your advantage. I violated 3 of the above 4 “rules” when I made the Pseudo-HDR Pan below. (I did use a tripod.)
Let’s consider various aspects of a composite image in turn.
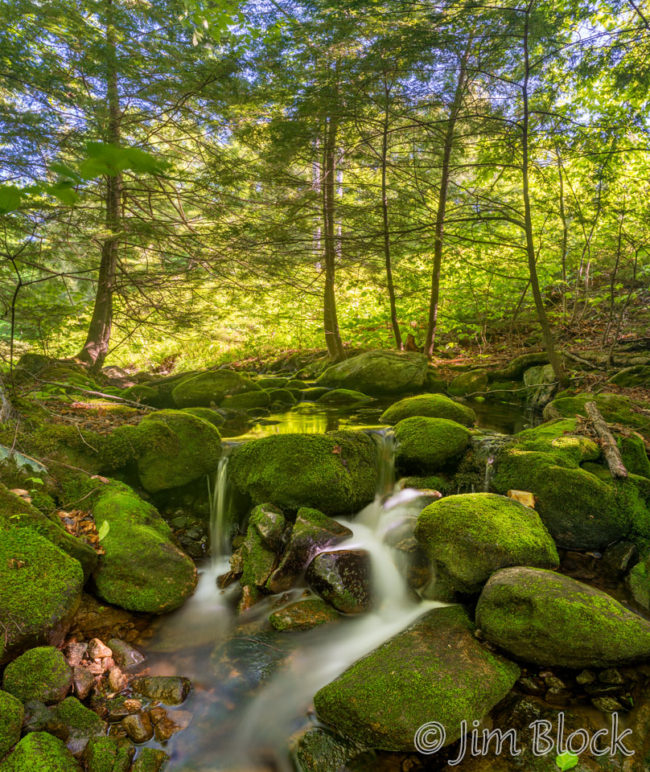
East Branch of Great Brook
Wider Field of View
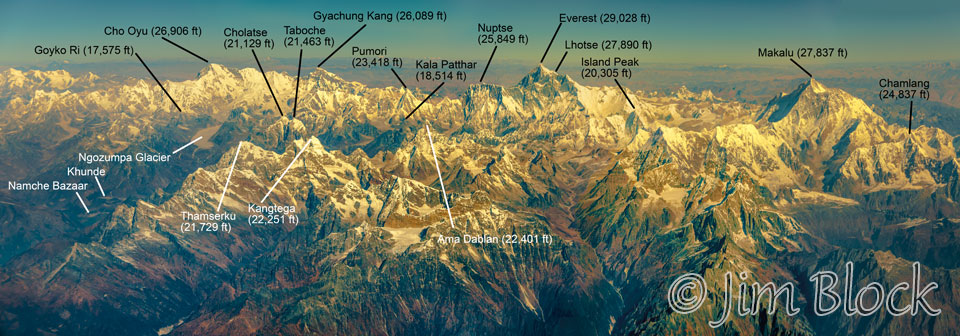
Below is a photo I took while flying over Nepal. I shot 4 images to get all of these Himalayan Mountains around Mount Everest in the Khumbu region. I stitched them in PS and then did a lot of work labeling the mountains with help from my friends Chhongba Sherpa and Steve Mock, co-directors of the Khumbu Climbing Center, hidden behind Thamserku in Phortse in this photo.
Increased resolution
Taking two or more images and combining them in a stitched “panorama” gives both a wider field of view and an image with more resolution than a single image. To my way of thinking, “panoramas” don’t have to be long and short, they can be tall and narrow, or even square. You could shoot 4 images in a 2 x 2 matrix or you can make horizontal or vertical “skinny” panoramas by photographing in either the landscape or portrait orientation. You have a lot of flexibility. Photomerge in Photoshop or other programs will handle these situations easily. The photo below is composed of 12 individual shots. Why? This was a spur-of-the-moment jaunt so the widest lens I had with me was 38mm on a crop frame camera. I needed multiple shots to get it all in.
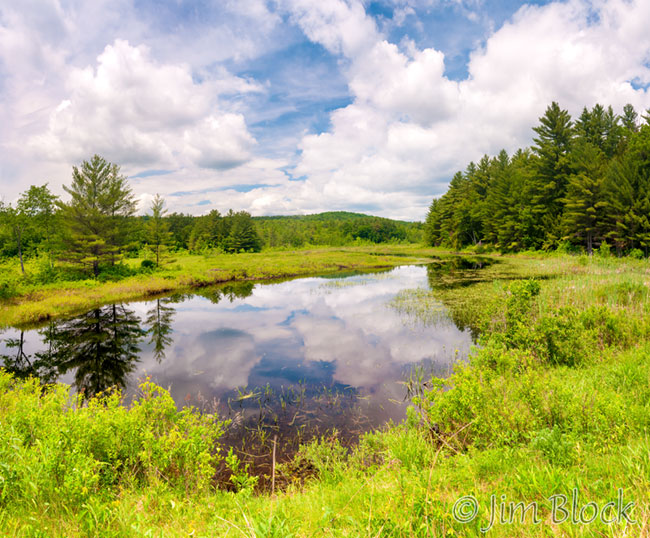
12-shot “panorama”
Sharpness and depth of field
Almost all lenses are sharpest a couple of stops down from wide open – typically around f/5.6 or f/8. When you have a scene with significantly magnified near subjects, a middle ground, and important details in the background, you have a dilemma.
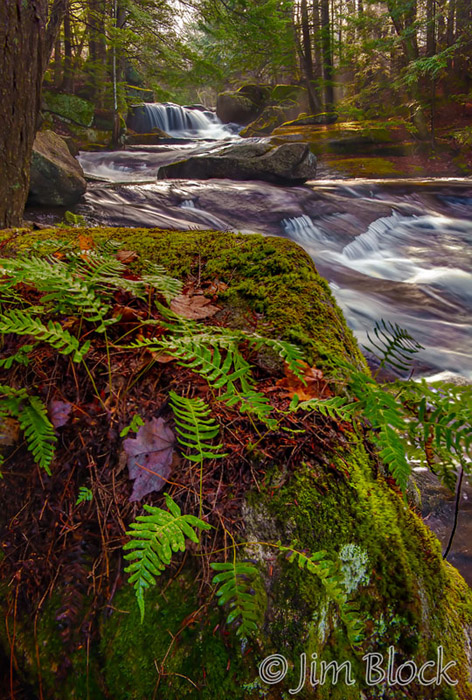
Focus Stacking Example
If you shoot at f/8, you probably will not have enough depth of field to keep everything in adequate focus. But if you stop down to f/16 or f/22 and focus a third of the way into the scene, you might be able to achieve adequate sharpness throughout the image, but these apertures will yield less sharpness than you would get at f/8 if depth-of-field was not an issue.
But you can put your camera on a tripod and take three or more photos manually focusing at different distances. You can then merge the images semi-automatically in Photoshop. Simply load them all as layers, select all the layers, go to Edit>Auto-Align Layers and then Edit>Auto-Blend Layers and presto you have an image with excellent depth of field and sharpest. Some people call this technique “focus stacking”. I did this with 5 photos for the image on the left. The polypody ferns along Bicknell Brook were less than 2 feet from my lens.
Dynamic range
A scene with great contrast – lots of brights and darks – may have more dynamic range than can be captured in a single image. One way to deal with this is to put your camera on a tripod and shoot multiple photos at different exposures. For example, you might take three photos with exposure compensations of -2, 0, and +2. You can then use HDR software in Photoshop or third-party programs to blend the three images thus compressing the contrast range. But there is another way, as described below. No “HDR Software” was used for any of the images in this “Pseudo-HDR” article.
Putting it altogether
So now we are ready to violate a bunch of rules and combine all of these factors to quickly and easily achieve a great image. A tripod certainly helps in this situation but it is possible to do what follows hand-held in some situations. Sometimes the light or the world is changing so fast that using a tripod is not practical.
Consider a typical scene with something very close to the camera that is fairly dark, a middle ground, and a background which typically could be very bright – like the sky. You need to shoot this scene quickly because the dramatic light is quickly fading, your family is getting impatient, or the Sherpas and the rest of the group are continuing to trek uphill oblivious to the great image you are creating. What do you do?
Set the camera on Aperture Priority with something like f/8 (the old “f/8 and be there” advice), use Auto Focus with the focus points located appropriately for each of the series of images, and shoot away. Since you are of course shooting raw, White Balance doesn’t really matter – either Auto or some fixed WB will be fine. If you are going to make a square or vertically oriented photo, hold the camera in the landscape orientation and shoot a series of images from the bottom up.
For the first shot the lens focuses on the lower part of the image and the meter exposes properly for it. For the second shot the camera will focus further into the scene also exposing properly for that area. As you continue up, the process continues to produce three or four or more images each focused and exposed properly for their own region. Since you are shooting digital, it costs nothing to overlap a lot.
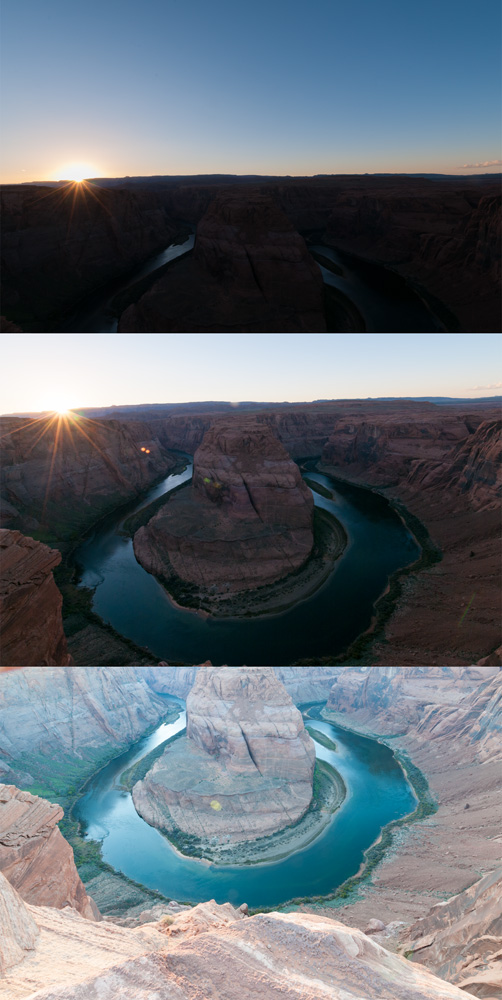
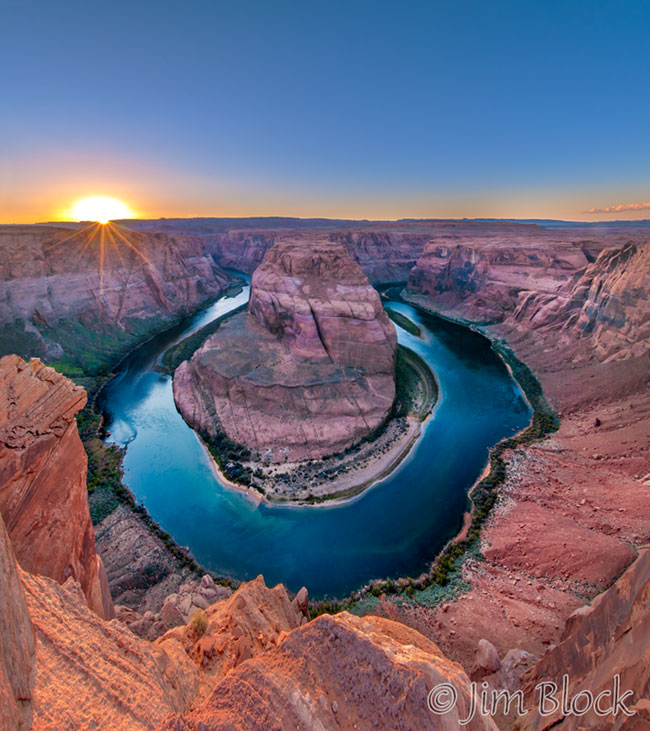
On the right are the three images I shot this way (with a tripod) at Horseshoe Bend in Page, Arizona. The ground on the bottom image is about 4 feet away, the Colorado River is 1000 feet below, and the sky is well …
But the exposures are all very different. So we need to do a little work blending them before we merge them. I use Adobe Camera Raw from Bridge, but a similar process could be done in Lightroom. Open all of the images in ACR and set a uniform White Balance for them. Then adjust each to closely blend with their neighbor. Typically I would open up the Shadows in the darkest image and turn down the Highlights in the brightest image, somewhat compressing the contrast of each image. From here it’s a simple matter to trigger Photomerge in Photoshop and let it do its magic. Quite often that is all that is required. Sometimes one needs to add a Masked Curves Adjustment Layer clipped to a single layer to adjust the tonality somewhat.
This process resulted in the image of Horseshoe Bend below.
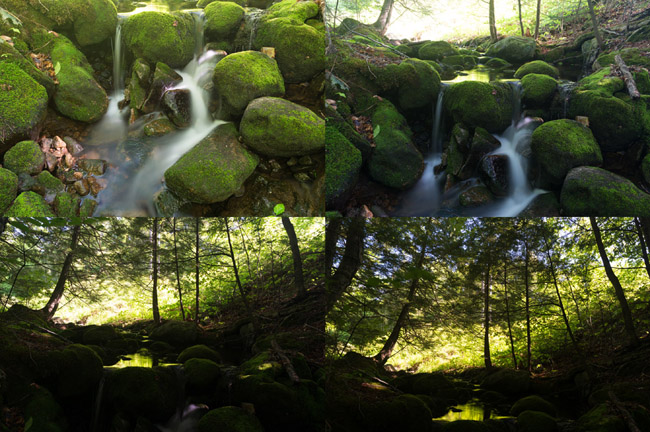
Below are the four individual “as shot” photos that I combined to create the Pseudo-HDR Pan at the beginning of this article. If you study them you can see how the camera created a middle-of-the-road exposure for each particular framing. It is a bit hard to believe something decent could come out of this mess.
Here is a brief slide show of some of the images I created using this Pseudo-HDR Pan technique.


